SteamVR Tracking License Day 3
Render Model
In our third and final day, we started out with creating our own render models for the reference objects given to us in our hardware development kit. Synapse taught the course using open-source software, namely Blender. After successfully modelling/downloading our render models (which included Thor’s hammer, a longsword, a Portal gun, and more), we tossed them into our SteamVR render models folder. If you want to change up some render models yourself, take a look at the format of them. Should be under:
Steam\steamapps\common\SteamVR\resources\rendermodels\
All it needs is an obj (same name as the folder) with forward pointing in the -z, a material file, and a texture file. That’s the format for any SteamVR Tracked object (so third party controllers like Oculus Touch may not work under that format). I’m not sure if this will throw any errors when trying to launch experiences, so it might be smart to make a backup if you plan on messing with any of these files!
Practice
So now Synapse wanted to be sure that we have what it takes to design tracked objects, and fix any problems that may arise. We were given various broken situations (ie. IMU axes inverted, sensors reporting incorrect positions, incorrect IDs, etc.), and then troubleshot them into correction. These activities were done on “UFOs” provided by Synapse (not included in our Hardware Development Kit). They were pretty much versatile tracked objects that we would select which sensors were active and then play around with its JSON file. After successfully troubleshooting the UFO problems, we spent some time experimented with activating various sensors on the UFO and observing its effect on tracking. It was pretty cool – we limited sensors to be only colinear or coplanar, and were able to experience pose rotation and translation error in real-time (was most evident when disabling the IMU)! Always cool to see theory come out in application.
Architecture
We then went over the electrical architecture and firmware technicalities. There’s not really much that I can say here, other than reiterate that Valve has made the decision to have Synapse lock down the firmware (and by extension a large amount of the bill of materials) to ensure a standard for the SteamVR Tracking ecosystem. If you want more info, sign up to be a licensee!
Putting it all Together
And so we’ve finally got it all. The sensor placement. The visualization and optimization. The JSON file. The Watchman. The render model. Troubleshooting and low-level understanding. We have the power to create a motion-tracked object with sub-millimeter accuracy in virtual reality. Bring it on.
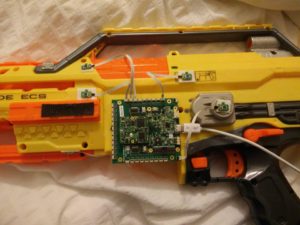
With still an hour and half left in the day, and with training formally over, one of our colleagues was eager to go through the full process (and we were happy to join in the fun). Ciuffo, the engineer from Synapse who was our amazing primary teacher for the course, ran off to his office and returned with an object that had plenty of variances in geometry to track: a Nerf gun (Photo credit again goes to Michael McClenaghan).
Michael was on hardware duty – he applied and wired up sensors, took physical measurements, and prepared the JSON. You can read more about his experience on that here. Our colleague Jack then assembled the render model, ensuring its orientation would match our physical device. I was pretty eager to explore next-steps with this process, so I hopped into Unity and began preparing a scene. Once our hour and a half was up, we had a system with impressively stable tracking (especially considering only 5 sensors +IMU were active), a properly aligned render model, and a successful “game” in Unity.
Needless to say, we were proud :) Just goes to show how efficient Synapse and Valve have made the prototyping process. (Also, sorry about the slow-motion; we accidentally recorded high-speed, but I think adds a slight charm to it).
Farewell Synapse
And thus concludes the epic journey that was SteamVR Tracking training. To say I had an amazing time is an understatement, and I think my colleagues from the course would readily agree. Synapse runs a great and creative environment, and I do hope I get to work with them again in the future. Cheers, Synapse – keep up the amazing structure and work you have going for you.
If any of you from the community want to reach out, we’ve got comments and we’ve got email (blog@talariavr.com) – feel free to hit us up! I’ll be summarizing the past three days in my next post, as well as answering any community questions that have rolled in since the training began. Keeping this blog is a neat and new experience for me, and I hope I’m providing you all with information that’s valuable to you. ‘Til next time!

Again, thanks for posting this, really interesting content for those that can’t attend the workshop!
Keep up the flow of information, much appreciated. And make sure to show us your wonky first prototypes when you’re done :)
Should be getting approval from Synapse on the next hardware post sometime this week!
In the meantime, I’m also starting to document creating an interactive storytelling experience. Just posted its storyboard tonight, feel free to check it out while you wait for the next hardware post :)
This is great! Did you guys get any information about the SteamVR driver, and any access to that?
We received general information regarding how the hardware interfaces with the driver; but in order to make changes to the driver itself, that would call for a conversation with Valve.