Initial SteamVR Tracking Experimentation
Motion Capturing a Mug in VR
I wanted my first through-and-through project/experiment with SteamVR to be something practical; I tossed around the idea of motion capturing my keyboard or mouse, some headphones, etc. – the usual things that folks want to be brought in to their virtual environment from the real world. I settled on a mug because of two reasons: 1.) There’s enough unused exterior surface on the mug that I’d have plenty of room to place sensors and the Watchman board, and 2.) It sounded pretty convenient to grab a drink in VR without removing the HMD. This timelapse shown above was recorded on the 17th of November, 2016, and covers approximately an 8 1/2 hour nonstop development process. I can shave that time down to at least 2 hours now that I’ve got this run under my belt and know what quirks can be run into. Once familiar enough, I could see having something hand-made together in 30 minutes being a practical timeline.
Modelling the .STL
So I started out with modelling a replica of the real-world mug in Blender (free and open-source 3D modelling software). This was my first full-on experience with Blender, so a good chunk of my time was spent learning the interface and following a basic tutorial. I probably gave this mug way too much fidelity, but hey, I’m proud of the little guy. Maybe one of these days I’ll look into texturing my models with something that’s more than just UV grid. More information regarding the render model can be found in my post from Day 3 of Synapse’s SteamVR Tracking training.
Verification Simulation
The HMD Designer simulation software is valuable tool for quantifying the optimization of custom shapes, as well as providing inspiration and validation for sensor placement. For reference, the Vive controllers have 24 sensors present on them. This mug uses 14 (a number chosen through a combination of physical limitations, simplicity’s sake, and quick simulation optimization).
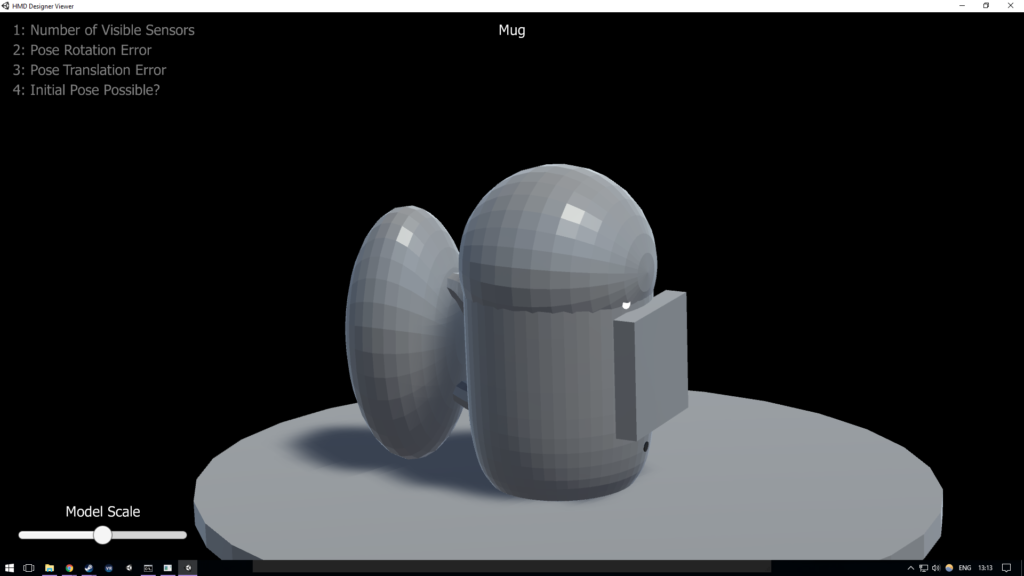
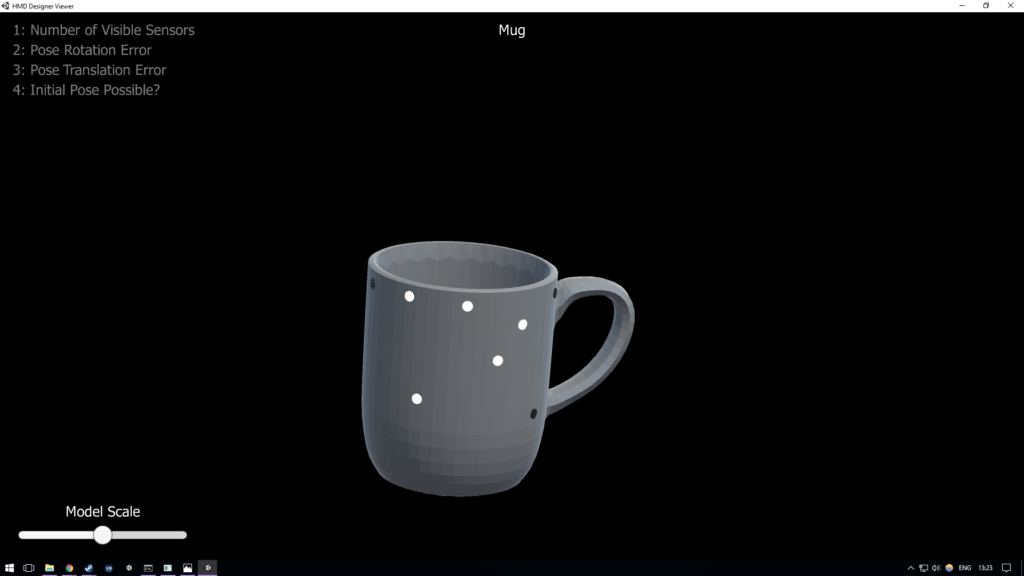
Below is a model of the mug, along with some occlusion models:
The reason for these occlusion models was so that the simulation wouldn’t place sensors on or near the handle, inside the mug, or under the mug, as well as to be mindful of the Watchman board’s presence (occlusion models are a separate setting in HMD Designer, yet render the same as the tracked object).
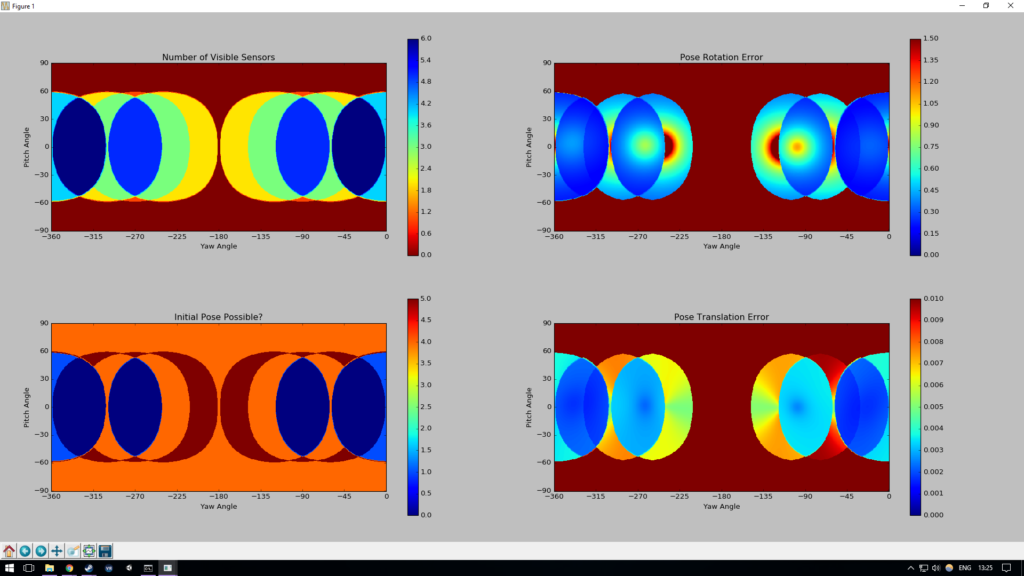
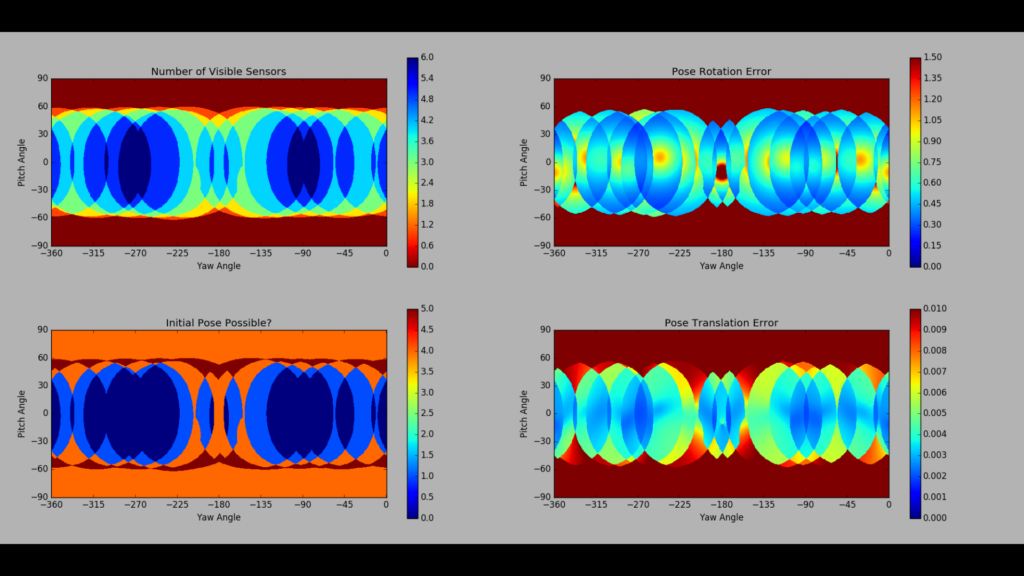
All simulations were pretty similar, but this one felt most systematic and balanced from the batch that I ran:
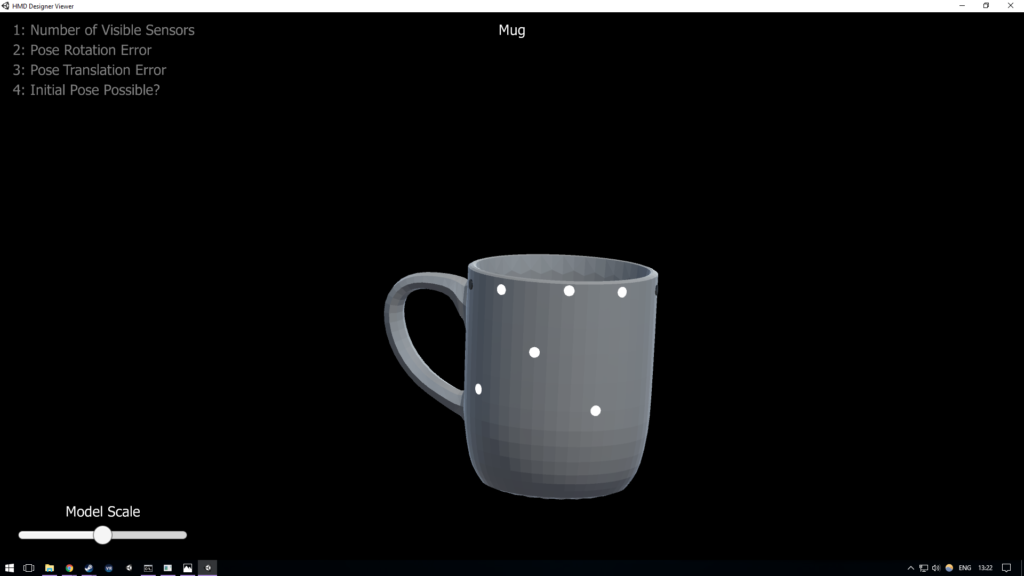
Those graphs are pretty good! Remember – the centre of each graph is the negative Z direction, unwrapping the other sides horizontally, and positive/negative Y spanning the top and bottom stretches of the graph. Feel free to refer back to my coverage of Day 2 of the training for a more thorough explanation of the graphs. But anyway, the centre of each graph would be the mug’s handle in this context. These results show that there is more or less manageable optical tracking from all side views of the mug. I used this placement as a launching point, primarily taking note of the sort of 5-point ‘X’ present on either side of the mug. And so here’s a shot of the final sensor positions that I calculated into the JSON:
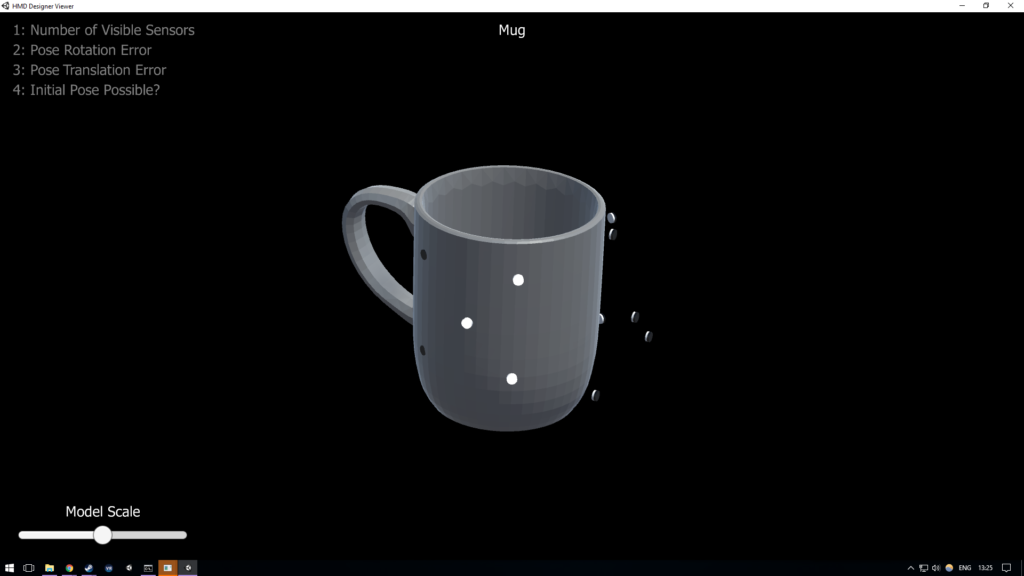
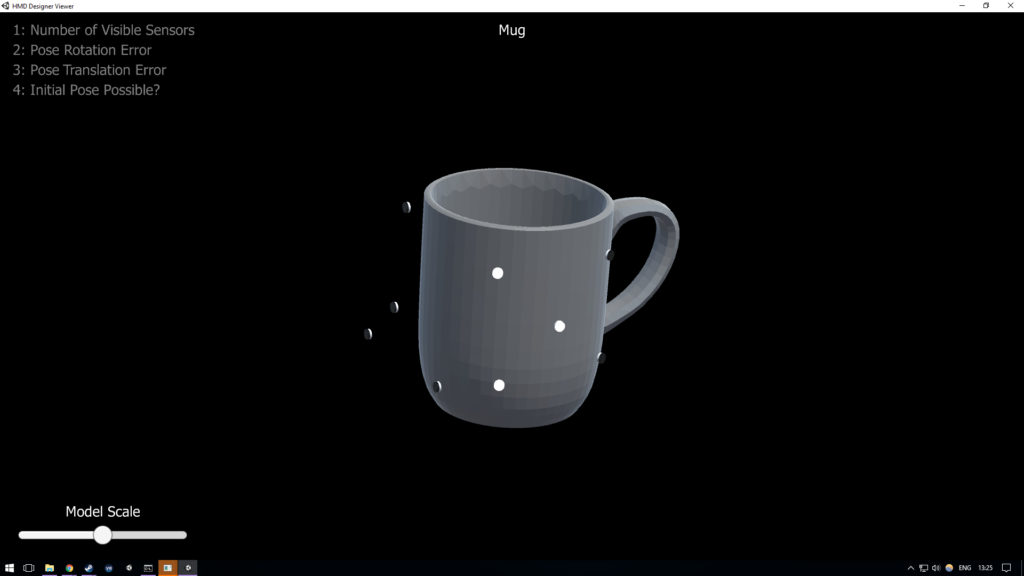
Note the 5-point ‘X’ being a lot more uniform. An ‘X’ on either side meant using 10 sensors, but also a blind spot in the front and back of the mug. To improve tracking beyond these 10 points, I set up the minimum number of sensors needed to catch a pose on the front of the mug – 4; and hence the total sensor count being 14. Check out this post for an in-depth review into what dictates sensor count and positions.
Now obviously there’s a lot of red/orange/yellow in the graphs. This is 100% not at all a marketable configuration, but it has enough blue/green zones to catch a pose from a front or either side view, and that’s satisfactory enough to move on and give this little experiment a go! Plus SteamVR does a pretty fine job at being able to solve poses based on the IMU and just 1 or 2 sensors alone once it’s locked down to a known position. So looking at the Initial Pose Possible graph, it’s clear that a front view or side view will catch a pose with deep blue confidence. Then from that point, using the Number of Visible Sensors graph, tracking will be able to “survive” from most views that isn’t from above or below.
Again, I’d like to reiterate that a proper prototype should be held to far higher standards than what I’m going for in this run. This was more so a test for me to ensure that I’m familiar with the SteamVR prototyping process. This is 10 sensors less than a Vive controller – between that and the fact this was hand-assembled in one night, I think this reliability is pretty OK.
Assembly!
I am a tinkerer, and hardware is my jam. This is always going to be the most fun part of the design process for me – hands-on development. Here’s some shots of the final assembly:
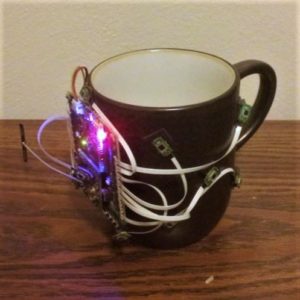
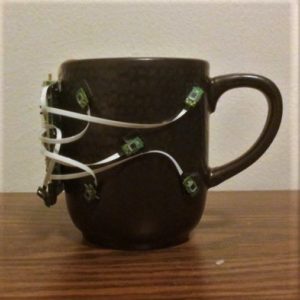
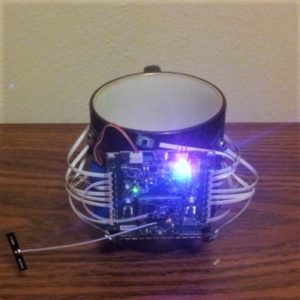
Everything is affixed to the mug with pressure sensitive adhesive tape, and for the short-term that stuff holds pretty well. Any long-term development and you’re going to want an epoxy or something else that has a lot more stick than just a bit of tape. For reference and scale, the Watchman board is the small square at the bottom centre of the board suite, best seen in the third picture. The application board is the larger board with the bright light, which the Watchman is plugged into; it also has the USB port and battery plugged in. Then the third board is the FPGA / sensor breakout, which has all those white connectors that the ribbon wires are connected to. That board attaches with the other end of the Watchman. And that little black rectangle sticking out to the left of the mug is the basic antenna for wireless communication.
Calibration and Caveats
Again bearing in mind that this was hand-measured and hand-assembled, the calibration and stability of tracking is pretty darn good! But that’s not to say it’s without problems. This clip shows how much error can come out of a poor calibration that only uses a small sampling range of tracking data:
And so that was a pretty unacceptable offset. After quite a bit of troubleshooting (I think it was between the calibration and modelling the .STL that ate away most of my time during this project), thinking the error was an issue with defining the centre of the mug in the JSON file, I concluded that the calibration was the culprit. Just think – if you want to achieve submillimeter accuracy, your sensors are going to need to be placed with submillimeter accuracy! Not by eye and hand as was done in this project – they should be in line with where the JSON expects them to be with minimal offset if you want a properly positioned result. So I moved on to recalibrate using a lot more tracking samples to work with, walking around the whole room so the system had plenty of different perspectives when solving for true sensor placement. Below is the recalibrated result:
This new result certainly isn’t great, but I’d say it’s pretty acceptable considering how hastily this rig was put together. Now let’s put it to use.
Having a Drink in VR!
As shown in the timelapse featured at the top of this post – it works! I was able to see the mug and its render model whenever opening the SteamVR dashboard, and could easily access it for a drink whenever I needed. But boy, was it terrifying taking that first sip – because of the HMD, I had to angle my head back along with the mug to the point where I was seriously concerned of flooding the headset. Haha, thankfully such an event did not occur. But I definitely foresee bottles and straws being a far more common way to drink from within VR in the future.
Oh, and it’s worth noting that the mug is wired in these videos because I made the mistake of plugging my SteamVR USB RF receiver directly into my PC (without a hub), and something they warned us about in the training is that proximity to USB 3.0 ports is a known issue that messes with RF communication. During the week after this prototyping marathon I was able to sustain stable wireless tracking by plugging into the headset’s extra USB connector (which oddly enough is blue, implying it’s USB 3.0…)
Further Experimentation
The neat thing about making custom SteamVR tracked objects is that they communicate to your PC the same way your Vive controllers (or HMDs) do, so as far as SteamVR and its hosted experiences are concerned, my mug was just a third controller. If I turned off one of the Vive controllers, then I was able to use my mug in place of it! Only a few games actually bring in the render model itself (most will replace the render model with something more custom/stylized for that experience), but it was pretty sweet punching beats and petting a robo-dog with a mug, haha.
Another thing to take note of is that when the pin is floating / not connected, the analogue trigger believes it is pulled all the way. You can see during the video I will grab things accidentally and not be able to let go. Interesting!
I kept this mug around for a little while, using it during long sessions to keep hydrated without breaking immersion; it was pretty sweet that something I made in one got so much use. But alas, exposed electronics attached to a vessel that’s host to water probably isn’t the smartest pairing… Bottom line, I managed to water damage one of the application boards given to us in the hardware development kit.
Whoops.
Thankfully it wasn’t the extremely valuable Watchman board, but still – darn. I was able to harvest the other application board out of the the reference object / mushroom from the training, but needless to say I didn’t use the mug anymore after that experience.
Next time…
I hope my ongoing documentation of this process is useful/interesting to you all! Next SteamVR post, we’ll look into exploring 3D printed parts and some early ideas on a prototypical product :)
I love hearing from the community, so I encourage you to join in the discussions down in the comments, or feel free to write me an email via blog@talariavr.com! ‘Til next time.
Wow! Really an amazing job!
And using the mug as a SteamVR controller is really awesome!
Thanks! Yeah, the controller substitution was a neat realisation to have some fun with :)
Very encouraging ;) ! Any thoughts on whether the hmd designer software will be made available to the public?
Thanks! Last I heard, the HMD Designer software is reserved for licensees only. Valve may have other plans for it in the future, but that’s entirely up to them if / when they release it.
If you’d like to read up on what it is the software is specifically doing, check out my post here:
http://www.talariavr.com/blog/steamvr-tracking-license-recap
The information there should allow you to achieve everything HMD Designer does, only by hand :)
Hi Nicolas – Just wanted to pop back in and let you know that Valve just opened up HMD Designer to licensees that have not attended Synapses training (so it’s free!)
Read more here: https://partner.steamgames.com/vrtracking
Awesome! Thank you for your reply. I’ll have a look into it ;).
This is really intense and hard work bro. Keep it up. Any suggestions where can I start learning VR development?
Hi Steve! So sorry on the delay in getting back to you.
If you’re looking to learn VR hardware development specifically, I gave a talk at Unity’s Vision Summit conference last year that frames how I would recommend getting into the indie hardware space: https://youtu.be/4WO-1HblxKk
If you’re looking to get into VR content creation, then there are a lot of great tutorials posted online! I’d recommend starting with Unity or Unreal, as those seem to be the two “go-to” engines for most developers right now.
Hope this info isn’t too late!
Hey! That is some really nice work. I recently received the Shoto Tracking HDK from Triad Semiconductors and I’m planning to try something similar. Unfortunately the whole documentation does not really help. Is there any chance you could explain the whole process in more detail (maybe a video?) That would be awesome! :)
Hey Marvin! I will soon begin playing around with the new Shoto kit myself – have you looked at both Triad’s documentation ( https://docs.triadsemi.com/ ) as well as the documentation included in the SteamVR Tracking HDK (Steam/steamapps/common/SteamVR Tracking HDK/training is what I find most useful, but /docs is also a good info source; see https://partner.steamgames.com/vrlicensing for more details on obtaining the license)? I would expect the Triad docs would help most with getting started with their new hardware integration, but then most of what is listed in the HDK training docs should still carry over to the new 2.0 system!… Read more »